
Have you been curious about running a hypervisor on your Pi or any ARM-based device before? Or just want something that can exhaust the whooole 8GB on your slick new RPi4? Or have you just always wanted to build a real functioning ESXi cluster to tinker around with vSphere cluster settings at home without having to find and pay for 2 to 3 full-size servers? Well you're in luck. Here's a step by step guide to installing vSphere 7 on a Raspberry Pi 4, and then configuring it into a working vSphere Cluster.
Requirements:
3x Raspberry Pi 4 8GB's
3x Raspberry Pi POE hats (optional- for single-cable connection to each host)
3x USB 3.0 Thumbdrives (64GB or more recommended) for virtual machine storage
3x USB 3.0 Thumbdrives (8GB recommended, this is to install vSphere 7 hypervisor onto permanently as your boot drive)
3x MicroSD cards- (8GB or more) for booting to UEFI on Raspberry Pi
1x MicroSD card with Raspberry Pi OS installed (steps below- required to update EEPROM firmware)
1x USB Thumbdrive (8GB or more, any USB protocol- this is just used to hold and install the image onto the above mentioned USB 3.0 drives for permanent install)
FOR CLUSTERED MODE- Requirements:
Existing vCenter instance (take a look at https://www.hyperadvisor.net/post/building-an-enterprise-level-home-lab-without-the-enterprise-rack-gear if you want to build a full-fledge vSphere cluster that can run vCenter). This guide will show you how to build all of your hypervisor hosts for a cluster, but clustering them is a separate walkthrough.
NOTE: vCenter is not installable on a Pi 4 as it requires a minimum of 12GB RAM.
Prerequisite- Install Raspberry Pi OS on an SD card to prep your Pi
(NOTE: Skip these steps if you've already got Raspberry Pi OS on a Pi, you don't need anything special in the OS, this is just a walkthrough for first-time users).
Download Raspberry Pi OS from here: https://www.raspberrypi.org/software/operating-systems/ ("Raspberry Pi OS with desktop" option recommended)
Use Rufus (recommended), Balena Etcher (new and reliable), or Win32 Disk Imager (old but my personal favorite) to image an SD card with the above image you downloaded in FAT32.
NOTE: If you're not familiar with this process, you might just want to use the official "Raspberry Pi Imager" from https://www.raspberrypi.org/software/. It will walk you through each step and image your SD card for you.
Insert the newly made SD card it into your Raspberry Pi, and turn the Pi on (make sure to plug in your keyboard, mouse and monitor to the Pi of course). Now that you're in the desktop, move on to the next steps.
Now, onto the guide.
There are plenty on the internet but hopefully this one is a little more simple and includes a pre-built SD card image I made to speed you through the process:
Make sure your Raspberry Pi is booted up into the Raspberry Pi OS, and that your keyboard/monitor/mouse are plugged in- and that your Pi is connected to the internet via wifi/ethernet.
Now you need to make sure you're running the latest version of the RPi EEPROM (minimum build date you'll need to update to is from September 10, 2020). Open a terminal window and type the following to check if there is a newer version than what you've got installed.
sudo rpi-eeprom-update
Now if there is a new version available, type:
        sudo rpi-eeprom-update -a
        sudo reboot
and your Pi will reboot and update the firmware. When it's booted up, type the first command above (sudo rpi-eeprom-update) again to check and verify the firmware is updated.
3. Now power off your Raspberry and remove your Raspberry Pi OS SD card.
4. Now, download the vSphere 7.0 ARM Fling image from VMware here (there's a green 'download' button toward the upper left of the window that'll require you to sign into VMware to get it): https://flings.vmware.com/esxi-arm-edition. You will have to create a free VMware account to do this, but it doesn't take long.

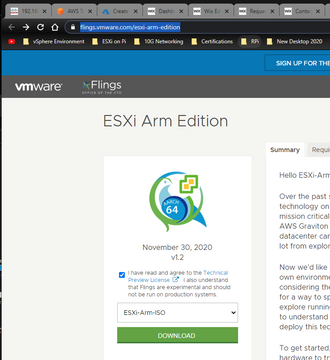


^LEFT: ARM Edition download page (I didn't even see the download button when I first went).
RIGHT^: Downloads page when you're signed in. Just download the vSphere 7.0 image for this walkthrough (not the HA .vib files below it)
5. Plug in a thumbdrive (8GB+, this will be the reusable 'installer' drive you'll use to install vSphere onto ANOTHER drive on each of your Pi's) and image it with the .ISO you just downloaded. You can use any of the imaging tools above I mentioned in the 'Prerequisite' section's Step 2 near the top of this post. Don't worry about any errors given to you from Rufus or Balena about it 'not being a bootable image'. It should work fine.

^Above is what your settings should look like when imaging your USB drive with Rufus.
6. Download the Raspberry Pi 4 UEFI boot image for your MicroSD card with this file:
^This zip is just a pre-made version of the 'boot files' creation process all other walkthroughs will make you do. This just saves those half-dozen or so steps by having them all in one file.
7. Insert your MicroSD card (not the Raspberry Pi OS one from above, but a new blank one) to the PC you're running all these steps off, and format the card with a FAT32 filesystem.
7a. NOTE: Formatting this card correctly is a critical step. If you're not using a brand new blank card, you should go into Disk Management (on a Windows PC) and check to see if your card only has one single FAT32 partition and no other hidden partitions from any previous installs you may have done one it. I spent 30 minutes troubleshooting a non-booting Pi before I realized this on my own card.
8. Once your card is formatted, unzip the archive you downloaded above (ReadyForSD.zip) and simply copy+paste the contents of the "boot" folder into the root directory of the MicroSD card. That means, assuming your MicroSD is the E:\ drive, you'll have E:\overlays (and a bunch of files) when you're done (not 'E:\boot'). No imaging of the card necessary (I know this might feel weird, but the Pi won't be booting into the MicroSD- it only needs the files located on it to boot it into its own UEFI BIOS).
9. When you've copied the files, put the card into your Pi. Power it on, and hammer the Escape key to boot into the UEFI BIOS setup. You should see the screen below for a brief moment before it takes you into setup- if you don't see this and you see the standard Pi bootloader screen with a wall of text and a red Raspberry in the right corner, then make sure you've followed steps 5 and 6 exactly and try again.

10. You should see the screen below. Navigate to >Device Manager>Raspberry Pi Configuration>Advanced Configuration>Limit RAM to 3 GB and set it to <Disabled>.

11. Now your Pi is ready for vSphere 7. Plug the vSphere 7 ARM Fling thumbdrive you prepared in Step 5 into any USB slot on your Pi. Have one of your blank 8GB thumbdrives plugged into another USB slot for VMware to install the OS onto.
12. Boot up your Pi, and hammer the Escape key again until you get back to the UEFI setup screen. Select >Boot Manager and find the thumbdrive you put the vSphere 7 ARM Fling onto, select it and let it boot. You should see this screen if everything was done correctly:

13. The setup process is pretty straightforward, but go through the wizard and choose to install vSphere 7 onto the blank 8GB drive you have plugged in, and allow it to install. If you don't see any options available for install, you'll need to troubleshoot. Try a different USB port, a different USB drive, make sure your USB drive is blank and only has a single partition, etc.
14. After the install, remove your installer thumbdrive (keep the 8GB drive you just installed everything onto plugged in though of course), and your Pi should boot right into vSphere on its own. No need to hit the Escape key... although if it isn't booting on its own, sure do the Escape thing and select the drive.
14a. Remember to plug in the 64GB+ drive that you'll use as your local datastore in ESXi when you've confirmed you can boot into vSphere and start configuring everything from the webclient.
15. If you've got a gray and pinkish-purple stripe ESXi 7 screen (similar to the gray+yellow above) after it's all booted, you've successfully installed vSphere 7 on your Pi! Now you can do your vSphere thing on any computer on your LAN! Get to virtualizing baby!
BONUS: If you have those Raspberry Pi POE hats, once you've configured your management IP on the Pi, just plug in the ethernet cable with the POE hat on, and watch it boot up without wires. It's honestly a sight to behold... a handheld ESXi hypervisor host, all powered through one single cable.
I hope you enjoyed this guide, and feel free to reach out to me if you have any questions!
Comments